Welcome to Bare Fitness, where we believe you don't need a gym to build serious, functional strength. Your own body is the most powerful and accessible piece of equipment you'll ever own. This guide is designed for anyone looking to get stronger from the comfort of home, cutting through the noise to show you exactly how to build muscle and power using only your own resistance.
In this article, you'll find the absolute best bodyweight exercises for strength, hand-picked for their effectiveness and scalability. For each movement, we provide step-by-step instructions for perfect form, highlight common mistakes to avoid, and offer clear progression paths for every fitness level—from absolute beginner to advanced athlete. To explore foundational techniques and equipment-free training further, you can find a broader range of bodyweight exercises here.
Our mission is to give you a practical, actionable blueprint for building muscle and enhancing your overall fitness. You have everything you need to begin right now. Let’s get started.
What You'll Need
The beauty of bodyweight training is its simplicity. Here are the bare essentials for this guide:
- Your Body: The primary tool for every exercise.
- Floor Space: Enough room to lie down and extend your arms and legs.
- A Sturdy Wall: For assistance and progressions.
- Optional: A pull-up bar, a sturdy bench or chair.
1. Push-ups
The push-up is a foundational compound exercise and a true powerhouse among the best bodyweight exercises for strength. It simultaneously builds muscle and resilience in your chest, shoulders, and triceps, while also demanding significant core stabilization. Its enduring popularity is a testament to its effectiveness and accessibility. No equipment, no gym, just you and the floor.
Step-by-Step Instructions
- Starting Position: Begin in a high plank position with your hands slightly wider than your shoulders, palms flat on the floor. Your body should form a straight, rigid line from your head to your heels.
- Engage Your Core: Squeeze your glutes and brace your abdominal muscles as if you're about to take a punch. This protects your lower back.
- The Descent: Slowly lower your body by bending your elbows. Keep your elbows tracking at a 45-degree angle from your torso, not flared out to the sides. Lower until your chest is just an inch or two from the floor.
- The Push: Powerfully press through your palms to push your body back up to the starting position, fully extending your arms.
Common Mistakes to Avoid
- Sagging Hips: Letting your lower back arch puts stress on your spine. Keep your core and glutes engaged to maintain a straight body line.
- Flaring Elbows: Pushing with your elbows wide out to the sides can strain your shoulder joints. Keep them tucked closer to your body.
- Partial Reps: Not going low enough cheats the exercise. Aim for a full range of motion on every single rep.
Modifications and Progressions
- Beginner: If a standard push-up is too challenging, start with incline push-ups (hands on a sturdy bench or table) or perform them on your knees.
- Intermediate: Once you can comfortably perform 10-15 standard push-ups, increase the challenge by slowing down the tempo.
- Advanced: Progress to more difficult variations like decline push-ups (feet elevated), diamond push-ups (hands close together to target triceps), or explosive plyometric push-ups.
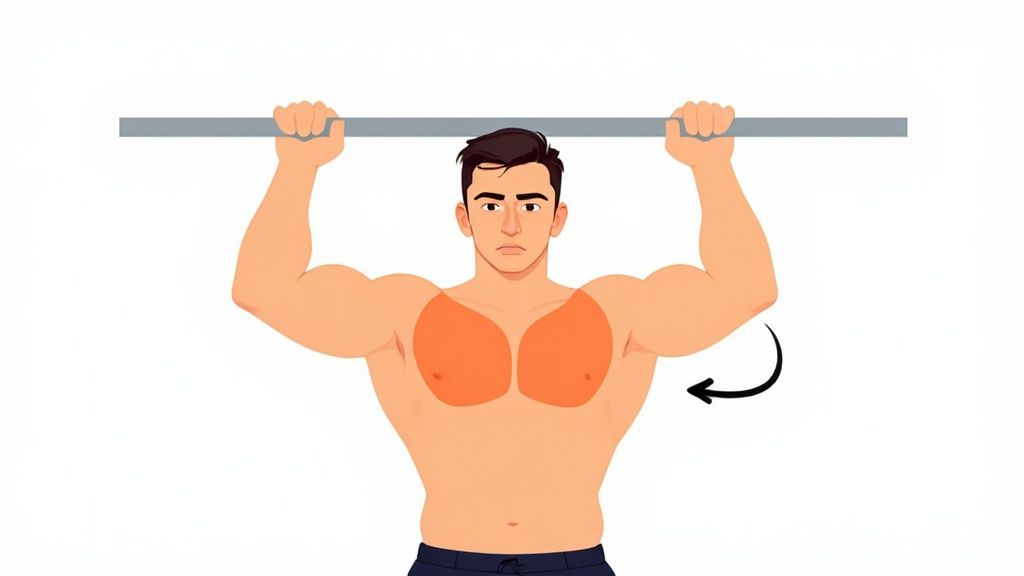
2. Pull-ups and Chin-ups
Often considered the ultimate test of upper-body strength, pull-ups and chin-ups are vertical pulling exercises that sculpt a powerful back and strong arms. The primary difference is your grip: pull-ups use an overhand (palms facing away) grip, while chin-ups use an underhand (palms facing you) grip. Both are among the best bodyweight exercises for strength and are essential for a well-rounded physique.
Step-by-Step Instructions
- Starting Position: Grab the bar with your preferred grip, slightly wider than your shoulders. Hang freely with your arms fully extended.
- Initiate the Pull: Before pulling with your arms, engage your back by pulling your shoulder blades down and back. Think of "breaking the bar."
- The Ascent: Drive your elbows down towards your ribs, pulling your body upward until your chin is clearly over the bar.
- The Descent: Lower yourself slowly and with control until your arms are fully extended again. Resist gravity on the way down to maximize muscle growth.
Common Mistakes to Avoid
- Using Momentum: Swinging your legs (kipping) to get over the bar is a different skill. For pure strength, avoid it.
- Not Using Full Range of Motion: Starting with bent arms or only pulling halfway up limits your strength gains.
- Shrugging Shoulders: Keep your shoulders pulled down and away from your ears to properly engage your back muscles.
Modifications and Progressions
- Beginner: Start with assisted pull-ups using a resistance band or an assisted pull-up machine. You can also master negative pull-ups, where you jump to the top position and lower yourself as slowly as possible.
- Intermediate: Once you can perform 5-8 clean reps, focus on increasing volume by adding more sets or reps.
- Advanced: To increase the difficulty, try weighted pull-ups (using a dip belt or weighted vest) or move to more complex variations like archer pull-ups or the muscle-up.
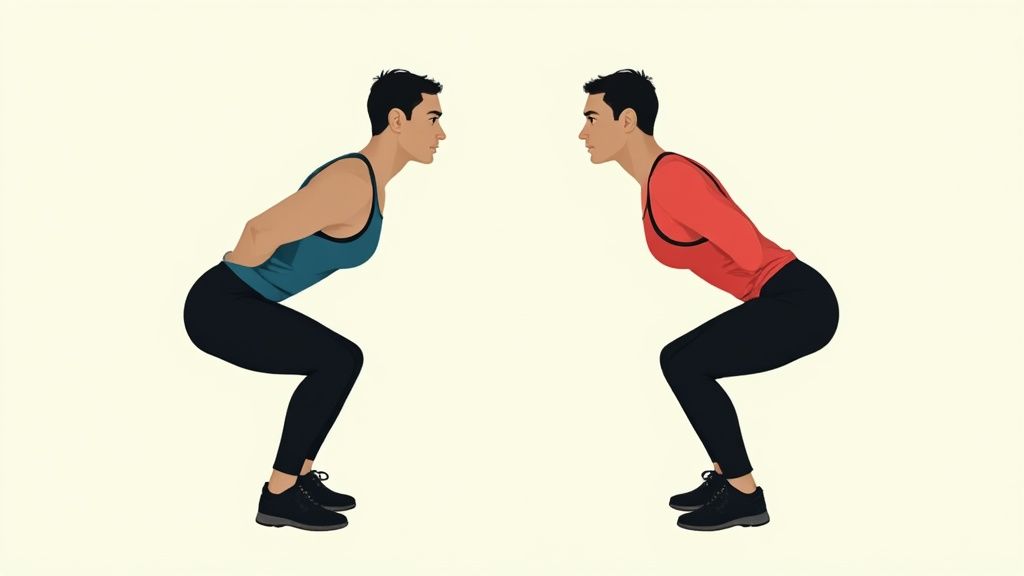
3. Squats (Bodyweight)
The bodyweight squat is the undisputed king of lower-body exercises and a fundamental human movement. As one of the best bodyweight exercises for strength, it develops powerful legs (quadriceps, hamstrings, and glutes) and a rock-solid core. The squat builds functional strength you use every single day, from getting out of a chair to lifting heavy objects.
Step-by-Step Instructions
- Starting Position: Stand with your feet shoulder-width apart, toes pointing slightly outward. Keep your chest up and your gaze forward.
- Initiate the Movement: Begin by pushing your hips back, as if you're about to sit in a chair.
- The Descent: Lower your hips down and back, keeping your chest up and your back straight. Aim to get your thighs at least parallel to the floor.
- The Ascent: Drive through your heels to return to the starting position, squeezing your glutes at the top.
Common Mistakes to Avoid
- Knees Caving Inward: This puts stress on your knee joints. Actively push your knees out so they track in line with your toes.
- Leaning Too Far Forward: Keep your chest lifted to avoid rounding your back.
- Lifting Your Heels: Your weight should be distributed evenly across your feet, with an emphasis on your heels.
Modifications and Progressions
- Beginner: If full squats are difficult, start with box squats, where you squat down to a sturdy chair or bench. This builds confidence and reinforces proper form.
- Intermediate: Once you master the standard squat, increase the difficulty by adding a pause at the bottom or performing jump squats for explosive power.
- Advanced: For a true test of strength and stability, progress to the single-leg pistol squat. Other variations include shrimp squats and split squats.
4. Dips
Often called the "upper-body squat," the dip is a cornerstone movement renowned for building serious pushing power. Using parallel bars, a bench, or even two sturdy chairs, this exercise primarily targets your triceps, chest, and shoulders. It is a highly effective way to add muscle mass and develop a powerful upper body.
Step-by-Step Instructions
- Starting Position: Grip the parallel bars with your palms facing inward. Push up to support your body with your arms straight.
- The Descent: Slowly lower your body by bending your elbows. Keep your elbows tucked close to your body. Lower until your upper arms are roughly parallel to the floor.
- The Ascent: Press forcefully through your palms to extend your arms and return to the starting position.
- Control Your Torso: Keep your torso upright to focus on the triceps. Lean forward slightly to engage more of your chest.
Common Mistakes to Avoid
- Going Too Deep: Lowering your body too far can put excessive strain on your shoulder joints. A 90-degree bend at the elbow is sufficient.
- Flaring Elbows: Allowing your elbows to flare out wide shifts the stress to your shoulders and away from your triceps and chest.
- Shrugging Shoulders: Keep your shoulders down and packed to maintain stability and protect the joint.
Modifications and Progressions
- Beginner: If parallel bar dips are too difficult, start with bench dips with your feet on the floor. To make it easier, bend your knees.
- Intermediate: Focus on increasing your repetitions with perfect form. Once you can complete 12-15 clean bodyweight dips, you are ready for a greater challenge.
- Advanced: The ultimate progression is the weighted dip. Use a dip belt or hold a dumbbell between your feet to add resistance. For a new stability challenge, try performing dips on gymnastic rings.
5. Planks (and Plank Variations)
The plank is a premier isometric exercise, making it one of the best bodyweight exercises for strength without any movement at all. It builds incredible stability and endurance throughout your entire core, including your abs, obliques, and lower back. This foundational hold is unmatched for creating the rigid, stable torso needed to support powerful movements and protect your spine.
Step-by-Step Instructions
- Starting Position: Place your forearms on the floor with your elbows directly under your shoulders and your hands clasped. Extend your legs behind you.
- Create a Straight Line: Your body must form a rigid line from your head to your heels.
- Engage Everything: Squeeze your glutes and actively pull your belly button toward your spine to engage your core. This prevents your lower back from arching.
- Hold and Breathe: Maintain this position, breathing steadily. Keep your neck in a neutral position by looking at the floor a few inches in front of your hands.
Common Mistakes to Avoid
- Arching the Lower Back: This is the most common mistake and indicates your core is not engaged. Focus on keeping your glutes squeezed.
- Letting Hips Rise: Your hips should be in line with your shoulders, not piked up toward the ceiling.
- Holding Your Breath: Breathe steadily throughout the hold to keep your muscles oxygenated.
Modifications and Progressions
- Beginner: Start by holding the plank for shorter intervals, like 15-20 seconds, or perform an incline plank with your forearms on a raised surface. You can also do a plank from your knees.
- Intermediate: Once you can hold a perfect plank for 60 seconds, it's time to add a challenge.
- Advanced: Introduce instability and movement. Try variations like plank with leg raises, side planks to target your obliques, or plank up-downs to add a dynamic upper-body element.
6. Handstand Push-ups
The handstand push-up is a pinnacle of overhead pressing strength. This advanced movement inverts your body, turning a classic push-up into an exceptional shoulder, upper back, and triceps builder. It’s one of the best bodyweight exercises for strength that also drastically improves your balance, core stability, and overall body control.
Step-by-Step Instructions
- Starting Position: Place your hands on the floor about 6-12 inches from a wall, slightly wider than your shoulders. Kick up into a handstand with your heels resting against the wall for balance.
- Create Tension: Squeeze your glutes and core to create a rigid body line.
- The Descent: Lower yourself by bending your elbows. Aim to bring your head to a point on the floor in front of your hands, forming a stable tripod.
- The Ascent: Powerfully press through your hands and shoulders to extend your elbows completely, returning to the starting handstand position.
Common Mistakes to Avoid
- Arching Your Back: This takes the load off your shoulders and puts it on your spine. Keep your core tight.
- Flaring Elbows: Just like in a push-up, keep your elbows from flaring out wide to protect your shoulder joints.
- Not Creating a Tripod: Lowering your head directly between your hands creates an unstable position. Aim for a triangle base with your hands and head.
Modifications and Progressions
- Beginner: Don't attempt the full movement yet. Master pike push-ups first to build foundational strength. Also, practice wall-assisted handstand holds to build comfort and endurance upside down.
- Intermediate: Progress to elevated pike push-ups (feet on a box) to increase the load on your shoulders. Then, attempt negative handstand push-ups, lowering yourself as slowly as possible against the wall.
- Advanced: Work on full wall-assisted handstand push-ups. The ultimate goal for many is the freestanding handstand push-up, a true display of strength and balance.
7. Lunges (and Variations)
The lunge is a fundamental unilateral exercise, challenging each leg independently. This dynamic movement builds powerful glutes, quads, and hamstrings while significantly improving your balance, stability, and mobility. Lunges are uniquely effective at identifying and correcting strength imbalances that exercises like squats might miss.
Step-by-Step Instructions
- Starting Position: Stand tall with your feet hip-width apart and your core engaged.
- Step Forward: Take a controlled step forward with one leg.
- The Descent: Lower your hips until both knees are bent at approximately a 90-degree angle. Your front knee should be directly over your ankle, and your back knee should hover just above the floor.
- The Ascent: Push off your front foot to return to the starting position. Repeat on the other side.
Common Mistakes to Avoid
- Front Knee Drifting Past Toes: This places unnecessary stress on the knee. Ensure you take a long enough step.
- Leaning Forward: Keep your torso upright and your shoulders back to engage your core and glutes properly.
- Slamming Your Back Knee: Control the descent to avoid hitting your back knee on the ground.
Modifications and Progressions
- Beginner: Start with static lunges (also called split squats) where your feet remain in place. You can also use a wall or chair for balance support.
- Intermediate: Progress to walking lunges or reverse lunges, which are often easier on the knees than forward lunges.
- Advanced: Increase the difficulty with Bulgarian split squats (rear foot elevated on a bench), explosive jumping lunges, or weighted lunges.
8. Pike Push-ups
If you're looking to build powerful shoulders without touching a weight, the pike push-up is your answer. This challenging exercise is a crucial stepping stone to the handstand push-up, making it one of the best bodyweight exercises for strength in the upper body. It shifts the emphasis from your chest to your shoulders and upper back.
Step-by-Step Instructions
- Starting Position: Begin in a standard push-up position. Walk your feet in towards your hands, raising your hips high into an inverted "V" shape. Keep your legs and arms as straight as possible.
- The Descent: Bend your elbows to lower the top of your head toward the floor. Aim for a spot in front of your hands, not between them.
- The Ascent: Press forcefully through your hands and shoulders to return to the starting inverted "V" position, fully extending your arms.
Common Mistakes to Avoid
- Flattening the Body: Don't let your hips drop. The goal is to keep them high to maintain the vertical pressing angle.
- Looking Forward: Keep your head in a neutral position by looking at your feet or the floor behind your hands. This protects your neck.
- Flaring Elbows: Keep your elbows tucked in at about a 45-degree angle to protect your shoulders.
Modifications and Progressions
- Beginner: If the standard version is too difficult, decrease the angle by walking your feet further back.
- Intermediate: Once you can do 10-12 clean reps, increase the difficulty by elevating your feet on a low box. This is known as a decline pike push-up.
- Advanced: To continue progressing, bring your hands and feet closer together to make the inverted V steeper. The ultimate goal is to build the strength needed for a full handstand push-up.
9. Muscle-ups
The muscle-up is an elite-level movement that combines an explosive pull-up with a powerful dip in one fluid motion. It is a definitive test of upper-body power, coordination, and technique. Achieving a muscle-up requires immense strength in your back, shoulders, chest, and arms, making it one of the most rewarding and best bodyweight exercises for strength you can master.
Step-by-Step Instructions
- The Explosive Pull: Grab the bar and initiate an explosive pull-up. The goal is to pull the bar to your lower chest, not just your chin.
- The Transition: As you reach the peak of the pull, quickly lean your chest over the bar while bringing your elbows up and behind you.
- The Dip: From this position, perform a powerful dip by pressing down to straighten your arms, finishing with your torso above the bar.
Common Mistakes to Avoid
- Attempting Before Ready: You MUST be proficient at pull-ups and dips first. Don't attempt a muscle-up until you can perform at least 10-15 clean pull-ups and 15-20 deep dips.
- Pulling Straight Up: You need to pull in a slight "C" shape to create space to get over the bar.
- Weak Transition: The transition is the hardest part. Many people get stuck here because they lack the specific strength and coordination.
Modifications and Progressions
- Beginner: Start with high pull-ups, trying to pull the bar as low down your torso as possible. Practice negative muscle-ups by getting above the bar and slowly lowering yourself through the transition and down to a dead hang.
- Intermediate: Use a resistance band to assist you. Loop a band around the bar and place your feet in it to get a feel for the full motion with reduced body weight.
- Advanced: Once you achieve your first muscle-up, work on cleaning up your form by minimizing any swing. Progress to performing multiple repetitions in a row or attempting the more challenging ring muscle-up.
10. Hollow Body Holds and Rocks
The hollow body hold is a fundamental isometric exercise that builds a rock-solid core and teaches total body tension. A staple in gymnastics, it is one of the best bodyweight exercises for strength because it builds the foundational stability required for more advanced movements like handstands and muscle-ups.
Step-by-Step Instructions
- Starting Position: Lie on your back. Press your lower back firmly into the floor. There should be no gap.
- Lift Off: Extend your arms overhead and your legs straight out in front of you. Simultaneously lift your arms, head, shoulders, and legs off the floor.
- Create a "Banana" Shape: Your body should form a gentle, concave curve. Keep your arms straight by your ears and your toes pointed.
- Hold: Maintain this position, focusing on keeping your lower back pressed into the floor and breathing steadily.
Common Mistakes to Avoid
- Arching the Lower Back: This is the most critical error. If your back comes off the floor, your core is no longer doing the work. Make the exercise easier until you can maintain contact.
- Craning Your Neck: Keep your chin tucked slightly to maintain a neutral neck position.
- Bending Knees or Elbows: To create total body tension, everything must be straight and engaged.
Modifications and Progressions
- Beginner: Start with a tuck hold, bringing your knees to your chest. As you get stronger, extend one leg at a time, and then both legs, keeping them higher off the ground to reduce the difficulty.
- Intermediate: Once you can hold a perfect hollow body position for 30-45 seconds, you are ready to add movement.
- Advanced: Progress to hollow body rocks. Maintain the rigid body shape while gently rocking back and forth from your shoulders to your glutes, using your core to control the motion without losing form.
Your Next Steps to Building Lasting Strength
You now have a complete arsenal of the best bodyweight exercises for strength. The power of this type of training lies in its accessibility and its demand for total body control. True strength isn't just about moving an external weight; it's about mastering your own body as a cohesive, powerful unit.
Putting Your Knowledge into Action
Knowing the exercises is just the first step. Building strength requires a smart, consistent plan. Here’s how you can turn this list into a routine that delivers real results.
- Start with a Foundation: If you're new to this, choose 3-4 exercises that cover major muscle groups (e.g., Push-ups, Squats, Planks, and an assisted Pull-up variation). Focus entirely on mastering the form.
- Structure Your Workouts: A simple and effective approach is to perform 3 sets of each chosen exercise, aiming for a rep range of 8-12. If you can’t complete 8 reps with good form, choose an easier variation. If you can easily do more than 12, it's time to move to a harder progression.
- Listen to Your Body and Prioritize Recovery: Your muscles grow stronger during periods of rest. To ensure consistent progress and prevent burnout, it's essential to understand how to effectively improve your muscle recovery. This includes getting adequate sleep, proper nutrition, and active recovery days.
- Track Your Progress: Keep a simple log of your workouts. Note the exercises, sets, and reps you complete. Seeing your numbers go up over time is one of the best ways to stay motivated.
The Path Forward: Consistency Over Intensity
Your journey to building strength with bodyweight exercises is a marathon, not a sprint. The key is to show up, do your best for that day, and celebrate the small victories. You don't need a gym or expensive equipment to become incredibly strong. You just need your body, the knowledge you've gained here, and the commitment to apply it.
Ready to take the guesswork out of your workouts? At barefitness.com, we provide structured, equipment-minimal workout plans and guides designed for busy people just like you. Explore our resources at barefitness.com and discover how simple and effective building strength at home can be.
More from
Lifestyle
category